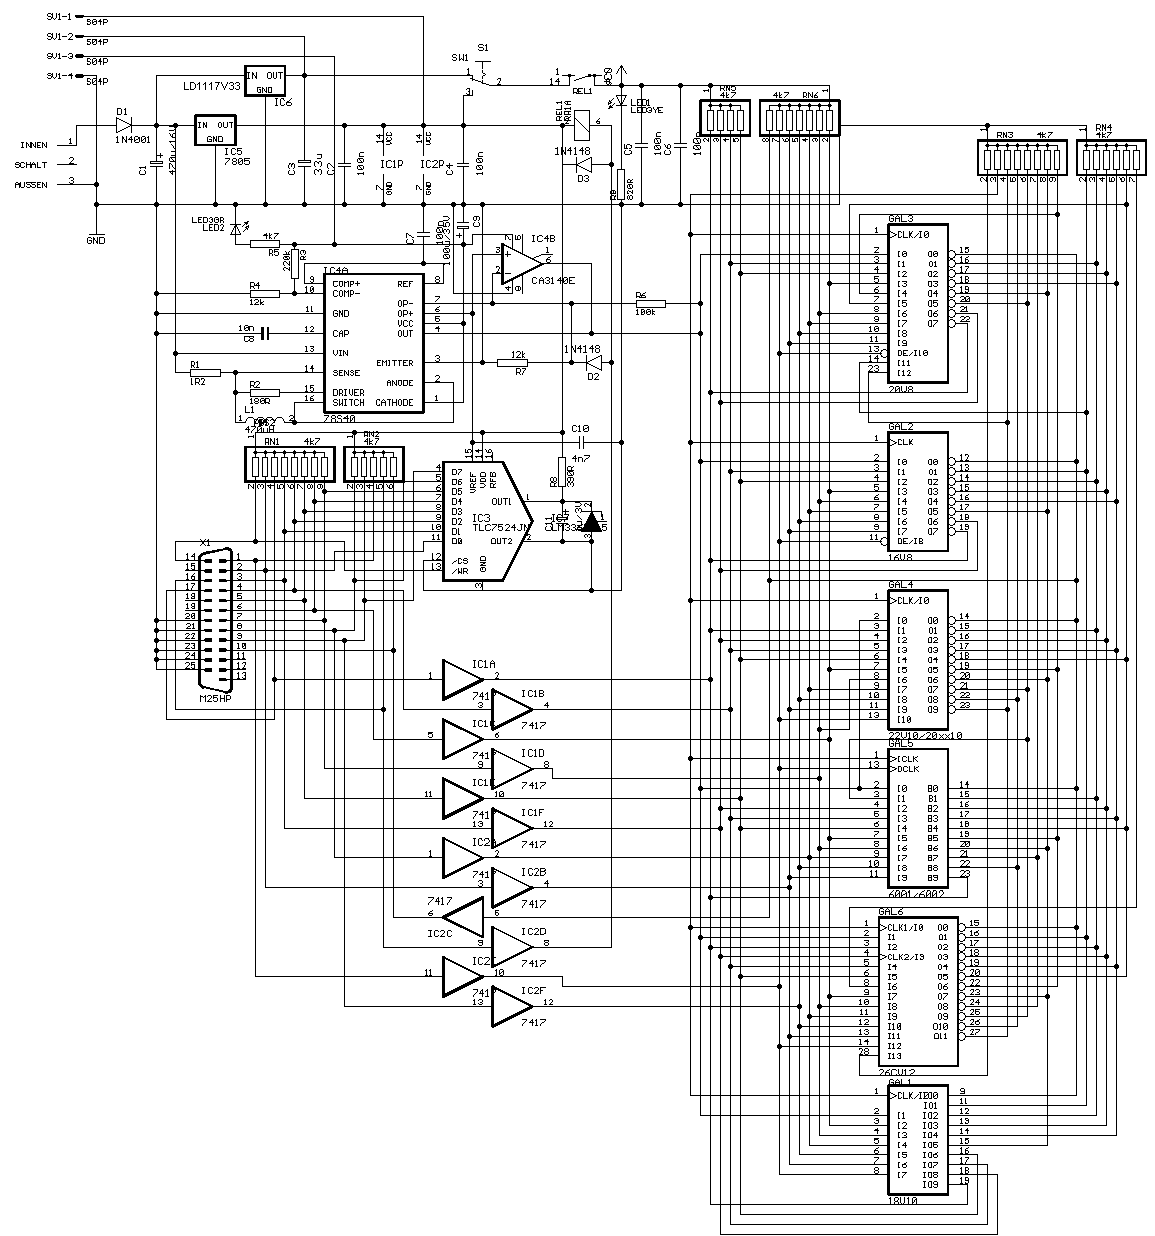
GALBlast requires you to build a cheap circuit to be connected to your computer's parallel port and a 9 to 12 Volt 250mA wall mount power supply. If you have no experience in building electronics circuits, have someone build it for you.
schema.gif (right click to download 48k image file)
I have used only cheap components that have been manufactured for a long time and are second sourced. Some parts may already be laying around on your table, but the other ones should be available at your local electronics store. Many components can be replaced by similar parts. PLCC sockets may be added using a larger PCB or adaptors. Be ingenious.
Bill of Materials
IC6, C3 and SW1 are only used to support Low-voltage GALs. Replace SW1 with a jumper wire connecting the output of the 7805 to the reed relay Rel1 in case you do not want to install these parts. Do not install parts marked with * if you choose IC4b instead of IC4a.
The prices given in the last column are german marks DM without tax and are taken from http://www.elpro.org catalogue 2000, and prove that all parts together do not exceed US$ 20.
|
IC1 |
hex open collector driver |
74(LS)07 or 74(LS)17 |
-.64 |
|
|
IC socket for IC1 |
DIL14 |
-.06 |
|
IC2 |
hex open collector driver |
74(LS)07 or 74(LS)17 |
-.64 |
|
|
IC socket for IC2 |
DIL14 |
-.06 |
|
IC3 |
8 bit D/A converter |
TLC7524 or AD7524 or MX7524 |
5.32 |
|
|
IC socket for IC3 |
DIL16 |
-.06 |
|
IC4a |
switch mode regulator |
uA78S40 or LM78S40 (or install IC4b instead) |
1.50 |
|
|
IC socket for IC4a |
DIL16 |
-.06 |
|
IC4b |
CMOS op amp |
CA3140E (instead of IC4a) |
|
|
|
IC socket for IC4b |
DIL8 (instead of socket for IC4a) |
|
|
IC5 |
5V/1A linear voltage regulator |
7805 |
-.35 |
|
(IC6 |
3.3V/0.8A linear voltage regulator |
LD1117V33 or LT1086CT3.3 |
1.96 |
|
IC7 |
2.5V voltage reference diode |
LM336Z2.5 |
1.40 |
|
D1 |
50V/1A silicon power diode |
1N4001..1N4007 |
-.04 |
|
D2 |
40V/100mA silicon signal diode |
1N4148 or 1N914 |
-.03 |
|
D3 |
40V/100mA silicon signal diode |
1N4148 or 1N914 |
-.03 |
|
LED1 |
light emitting diode 10mA yellow |
LED 3mm yellow |
-.09 |
|
LED2 |
light emitting diode 10mA green |
LED 3mm green |
-.09 |
|
L1 |
storage coil 470uH / 300mA |
DPU 470uH/0.5A * |
1.46 |
|
C1 |
electrolytic capacitor |
470u/35V/200mil |
-.23 |
|
C2 |
ceramic capacitor |
100n/50V/100mil |
-.08 |
|
(C3 |
tantalum capacitor |
33u/6.3V/100mil, or as specified in the data sheet of IC6) |
-.41 |
|
C4 |
ceramic capacitor |
100n/50V/100mil |
-.08 |
|
C5 |
ceramic capacitor |
100n/50V/100mil |
-.08 |
|
C6 |
ceramic capacitor |
100n/50V/100mil |
-.08 |
|
C7 |
ceramic capacitor |
100n/50V/100mil |
-.08 |
|
C8 |
ceramic capacitor |
10n/50V/100mil * |
-.11 |
|
C9 |
electrolytic capacitor |
100u/35V/100mil |
-.07 |
|
C10 |
ceramic capacitor |
4n7/50V/100mil |
-.12 |
|
C11 |
tantalum capacitor |
1u/3V/100mil |
-.16 |
|
R1 |
resistor |
1R2/0.25W 1% * |
-.15 |
|
R2 |
resistor |
180R/0.25W * |
-.14 |
|
R3 |
resistor |
220k/0.25W 1% |
-.15 |
|
R4 |
resistor |
12k/0.25W 1% |
-.15 |
|
R5 |
resistor |
4k7/0.25W |
-.14 |
|
R6 |
resistor |
100k/0.25W 1% |
-.15 |
|
R7 |
resistor |
12k/0.25W 1% |
-.15 |
|
R8 |
resistor |
390R/0.25W |
-.14 |
|
R9 |
resistor |
820R/0.25W |
-.14 |
|
RN1 |
9 pin SIL resistor array |
4k7*8 |
-.19 |
|
RN2 |
6 pin SIL resistor array |
4k7*5 |
-.18 |
|
RN3 |
5 pin SIL resistor array |
4k7*4 |
-.15 |
|
RN4 |
8 pin SIL resistor array |
4k7*7 |
-.18 |
|
RN5 |
9 pin SIL resistor array |
4k7*8 |
-.19 |
|
RN6 |
7 pin SIL resistor array |
4k7*6 |
-.21 |
|
Rel1 |
DIP reed relay 5V/20mA SPST or SPDT with or without internal diode |
RR1A05 |
1.88 |
|
(SW1 |
SPDT switch or 3 pin jumper posts |
MS611A) |
1.79 |
|
X1 |
90° SubD 25 pin male connector |
DMR25M |
1.92 |
|
X2 |
DC 2.5mm power connector |
HEBG25 |
-.37 |
|
(X3 |
alternate DC power connector |
4 pin, do not install if X2 is used) |
|
|
GAL1 |
precision IC socket |
20pin |
-.45 |
|
GAL2 |
precision IC socket |
20pin |
-.45 |
|
GAL3 |
precision IC socket |
24pin 300mil |
-.58 |
|
GAL4 |
precision IC socket |
24pin 300mil |
-.58 |
|
GAL5 |
precision IC socket |
24pin 300mil |
-.58 |
|
GAL6 |
precision IC socket |
28pin 300mil |
-.64 |
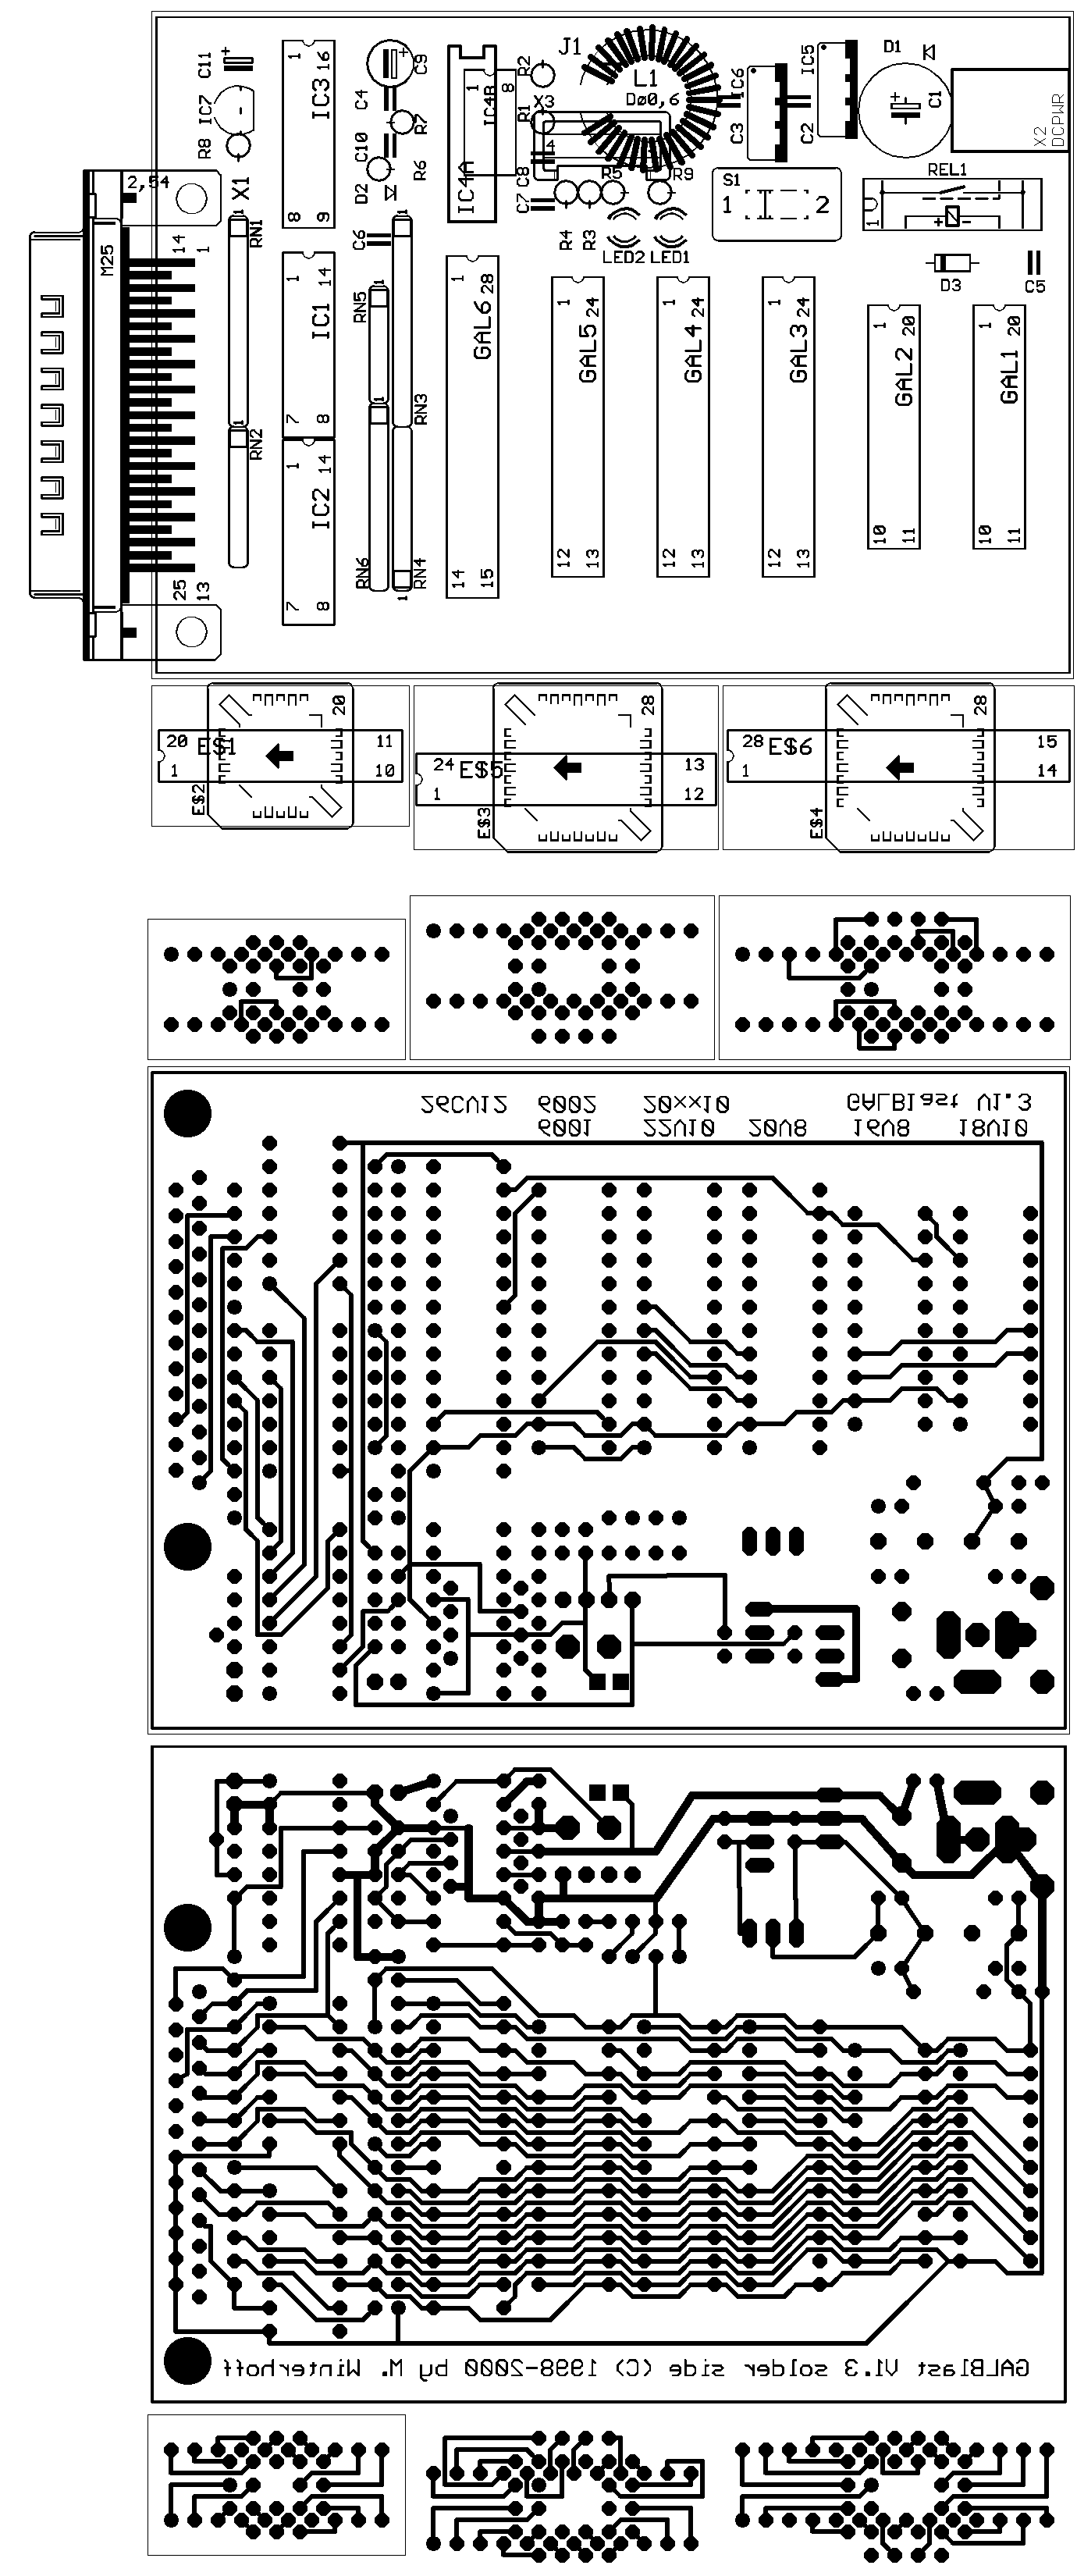
Create the double sided PCB by printing the layout file layout.gif at 300dpi, or send the layout file GALBLAS1.BRD to a PCB service of your choice (like http://www.pcb-pool.com) to have the board manufactured. If you would like to modify the schematic or layout, download the free 'light' version of the circuit layout editor Eagle 3.5 from http://www.cadsoft.de, which was used to create the files.
layout.gif (right click to download 129k image file of 300dpi resolution)
eagle.zip (download 40k Eagle circuit design files GALBLAS1.BRD and GALBLAS1.SCH)
plccadap.zip (download PLCC adaptor Eagle board file)
old.zip (download old 37k Eagle circuit files using ZN428 instead of AD/MX/TLC7524 and LM336Z2.5)
Grzegorz Krzyzanowski used an AD557 instead and had to add a 100R series resistor between the output and C10 to prevent oscillations for proper operation. Pay attention to the pinout of IC6, there are different pinouts used.
Solder all components (possible excepting IC6, C3 and SW1, which is replaced by a jumper wire) onto the PCB using sockets for all ICs, connect a wall-mount power supply delivering 9 to 12 Volt at 250mA to the DC power connector (with the positive wire on the inner connector) and measure the voltage at pin 14 of IC1 with respect to GND (pin 7 of IC1). It should read +5V. If this doesn't work, check the polarity of the power connection and the circuit.
Disconnect the power supply, insert IC4, reconnect the power supply and check if the green LED will light up. Check the switching regulator if it is not working.
There are more ways to power the GALBlast circuit than using a 9-12V voltage source and the 78S40 switching regulator. You may connect a laboratory power supply delivering +5V (@250mA) and +24V (@20mA) to X3. Install X3 and do not install R1, R2, C8, L1 in this case and replace the 78S40 (IC4a) by a CA3140E (IC4b). You may even decide to supply only +24V (@250mA) to X1 from a regulated power supply and mount a heat sink of 8K/W to IC5 (and IC6 if installed) and set the jumper wire J1. Do not install J1 in other cases, as a shortage will result. Do not try to use the +24V-only-version without a heat sink on IC5.
You may instead use an 18VAC 500mA source, a bridge rectifier, and electrolytic filter capacitor to produce +24V DC unregulated, sufficient to power GALBlast, but the best solution is a 9V AC source with bridge rectifier and electrolytic filter capacitor, which generates unregulated 12V DC @ 250mA to power the LM7805 and LD1117V33, and connect a voltage doubler (2 diodes, 2 capacitors) to produce unregulated 24V DC @ 40mA out of the 9V AC source.
If you use the 78S40 switching regulator, you may spare IC7, R7, and C8, and use a wire to connect pin 1 of IC3 to pin 8 of IC4a, reusing the reference voltage from the switching regulator for the D/A converter. You have to replace R6 with 220k to match the amplifier to the lower reference voltage.
How to build a suitable coil: Use an air gapped pot core 18/11-3H1 from Valvo or 2000N28 material pot core B65651-K0315-A028 (bobbin B65652-A0000-M001) from Siemens/Matsushita with an Al value of 315uH and wind 38 turns of 0.4 - 0.5 mm diameter magnet wire onto the bobbin. (Use 34 turns on Al 400 cores). Glue the pot core halves together and glue the coil to the board.
Disconnect power, insert the other chips, reconnect power and plug the board into your computer's parallel printer port. Launch GALBlast, select the printer port used, and try to talk to the board. The yellow LED should turn on for seconds if you issue a 'Read GAL' command, longer if you issue a 'Write GAL' command (a message box complaining about a wrong PES will appear als long as no GAL is inserted). Use the command 'Setup...' from the 'Port' menu, measure the voltage between pin 2 of any GAL socket with respect to GND on pin 10 of 20 pin sockets or pin 12 of 24 pin sockets, and enter the measured voltage to calibrate the programming voltage.
If something doesn't work, check the circuitry and the components.
If everything looks good, insert a GAL into the proper socket and try to read the contents of the GAL. The PES should be successfully read. Otherwise check the circuitry for broken traces and vias, bad solder joints, bad chips and anything else.
Ready to go