Cooking with Light
Making Solar Toast
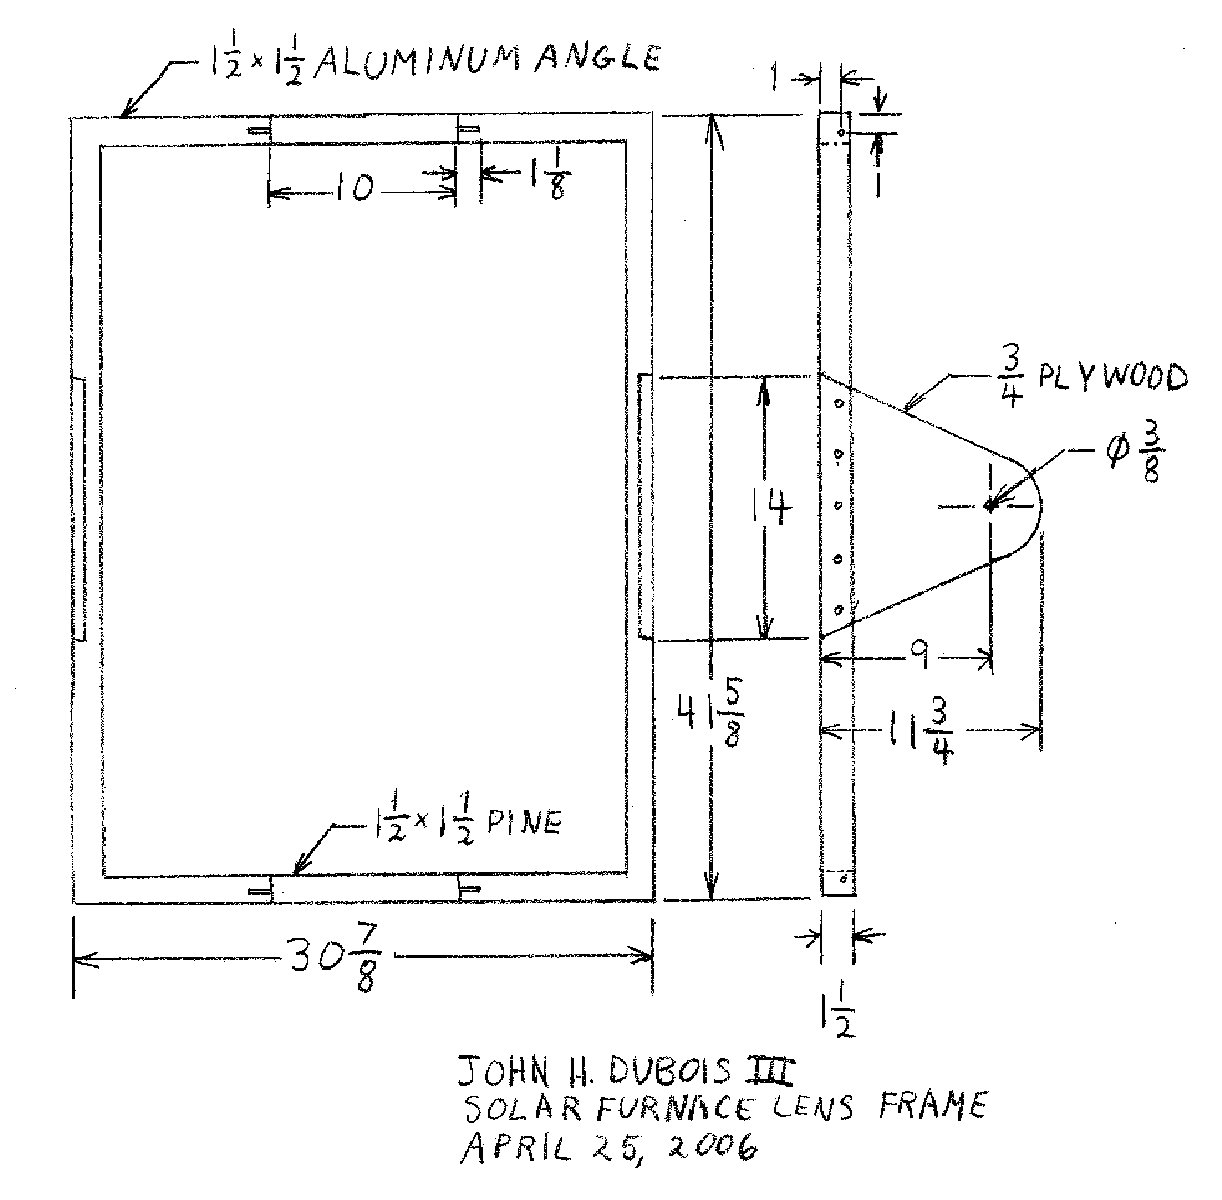
Here's a plan for the lens frame. Sorry, I've forgotten everything I learned about Autocad in 1991, so instead of a CAD plan you get a scan of a pencil drawing on vellum, based upon dimly remembered drafting principles from the same period :)
Adjust the dimensions so that your lens will fit inside it. If you use 1/8″ aluminum, make it about 3/8″ larger outside than the lens. Note that even if you buy the same lens I did, you'll need to make the frame larger than shown in the plans. Remember that my lens was originally mounted on top of the frame. When I rebuilt the frame, I wanted to put the lens inside it, but I didn't want to rebuild the altitude mount base. So, I made the frame longer but the same width, and just cut the long sides of the lens down to fit, using a plastic-cutting blade on a table saw (the lens I have is made from acrylic and is easily cut).
Optionally attach the lens to the inside of the frame with bolts or whatever suits you. The lens I bought had reinforced bolt-holes molded into it, though I cut most of them off when I cut the lens down. With the lens mounted inside the frame, attaching it isn't strictly neccessary, because it will be held in on all four sides by the altitude mount boards and focal plane basket mounting boards.
Above the lens, on the inside of the frame, attach the upper altitude mount boards. Those are the objects marked “¾ PLYWOOD”. I attached them with bolts; you could use wood screws. The shape is not too important, but wherever you drill the 3/8″ pivot holes should be at least 2¾″ from any edge if you build the base as described (with 5˝″ lumber). For appearance, I rounded the “point” of the board to a 2¾″ radius from the pivot hole. The distance from the pivot holes to the lens will affect the balance of the lens when it is mounted. If you plan on mainly using it without the focal plane basket, you should reduce the distance.
The two “1˝x1˝ PINE” objects are mounting points for the basket. Like the altitude mount boards, they are attached inside the frame above the lens. Driven into each end is a Ľ″ diameter hanger bolt. A hanger bolt has a wood screw thread on one end and a machine thread on the other. The ones I used had 1 1/8″ of machine thread, which was perfect. You can drive them in by threading a nut on and driving the nut with a deep socket. As shown in the plan, the hanger bolts are offset so that they are 1″ from both of the sides of the the board that touch the frame/lens.
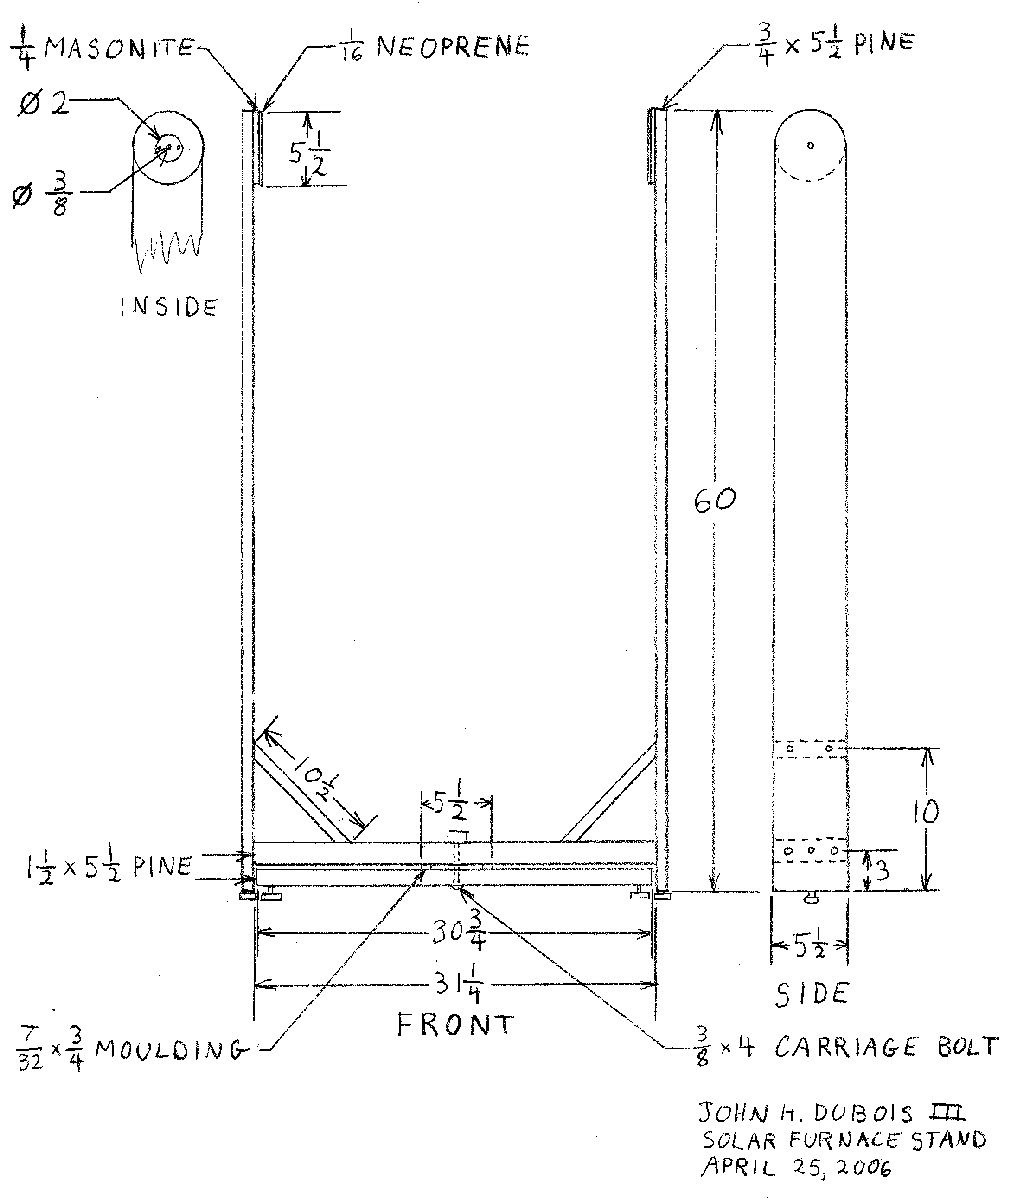
Here's a plan for the altitude mount base. At the top is a rubber-surfaced friction plate to adjust and hold the altitude (angle) of the lens. At the bottom is a foot that stores in plane with the frame, and folds out to form a cross shape.
The friction plate at the top consists of a 5˝″ diameter piece of Ľ″ masonite with a piece of 1/16″ neoprene rubber glued on it (be sure to use a glue that will adhere to rubber). Before gluing the neoprene on, remove a 2″ diameter circular section from the middle, so that the compressive force of the lock knobs is applied where it will do some good. You can glue the disks to the mount or attach them with bolts or screws. If you use bolts or screws, then after applying the neoprene, drill countersunk holes for them near the edge of the center neoprene-free 2″ region of the disk. I used bolts, with torque nuts so they wouldn't project on the outside, where they'd be liable to catch on things. After attaching the disks, drill a 3/8″ hole through the exact center of the disks and through the boards they're mounted on.
Drill a 3/8″ hole through the center of the face of the horizontal 2x6 that the vertical pieces will attach to, and also through the center of the face of the fold-out foot.
|
Cooking with Light |
Making Solar Toast |