INDUCTANCE METER ADAPTER
Measure inductance with this add-on circuit and an ordinary DMM.
by Mark Spiwak
An inductance meter could be a valuable test instrument for a hobbyist
to own. However few people own them because of the high price tags
found on such instruments. That's about to change.
The Inductance Meter Adapter described in this article is a circuit that,
when connected to a digital multimeter (DMM), lets you measure low-valued
inductances. The project can be built for a couple dollars, or less,
depending on what parts are in your junk box. Or you can buy a kit of
parts including a PC board from the source mentioned in the Parts List.
The range of the Adapter is actually quite impressive. It allows your DMM
to measure inductance from 3 microHenries to 7 milliHenries in two ranges.
Basically, when the Adapter has an inductance connected at its input
terminals, it develops a DC voltage at its output terminals that your DMM
can measure and display as a calibrated inductance measurement. An analog
multimeter cannot do the job because it's input resistance is below the
minimum 1-Megohm required for the adapter's proper operation.
The Adapter certainly can't replace a fine piece of test gear, but it's a
handy little instrument for sorting unlabeled parts, and matching inductors
to one another. Another great feature of the Adapter is that you can have
it working in less than an hour, with or without the kit.
CIRCUIT DESCRIPTION.
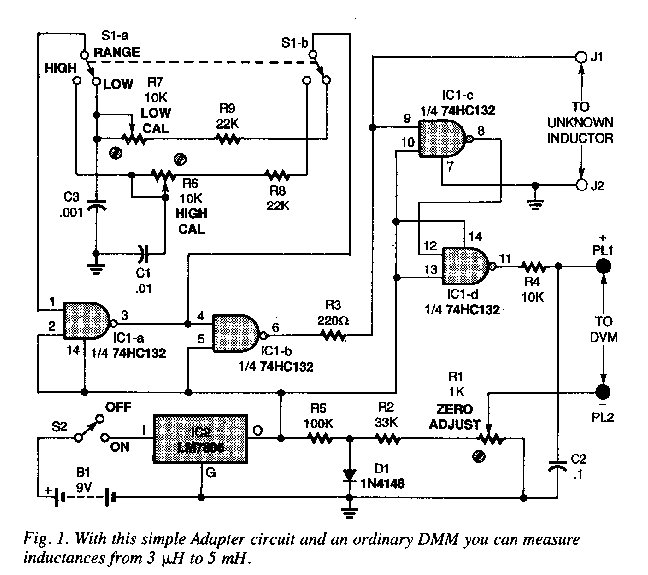
The schematic diagram for the Adapter is shown in Fig. 1.
The circuit is powered from a 9-Volt battery, B1, and an LM7805 regulator,
IC2, provides a regulated 5-Volt source for the rest of ther circuit.
Switch S2 turns the power on and off.

The heart of the circuit is a single 74HC132 quad Scmitt NAND-gate IC1.
The first gate in the package, IC1-a, is configured as an oscillator whose
frequency is determined by the RC components (including trimmers R6 and R7)
in its feedback loop; IC1-b is a buffer/inverter.

One input of both IC1-c and IC1-d is tied to +5 Volts, with both sections
configured as inverters. The square-wave output from IC1-b is fed to the
pin-9 input of IC1-c, and pin-9 also connects to J1, one of the test-inductor
input terminals.

When the inductor is connected across J1 and J2, the voltage input to IC1,
pin 9 stays higher for a longer period, depending on the value of the inductor.
With the output of IC1-c feeding the IC1-d, the resulting average DC voltage
across the output terminals (J3 and J4) is directly proportional to the
unknown resistance. Potentiometers R6 and R7 calibrate the circuit for High
and Low ranges, respectively, and potentiometer R1 sets the zero point on
the DMM.

When the circuit is calibrated with a known inductance and properly zeroed out,
the output voltage can represent inductance. Switch S1 selects the Adapter's
range; the circuit will measure from 3uH to 500mH in the Low range and from
100uH to 5 mH in the High range.

CONSTRUCTION.

The Adapter circuit is simple enough to build using point-to-point wiring.
However, if you prefer to use a PC board, you can etch your own from the foil
pattern shown in Fig. 2,
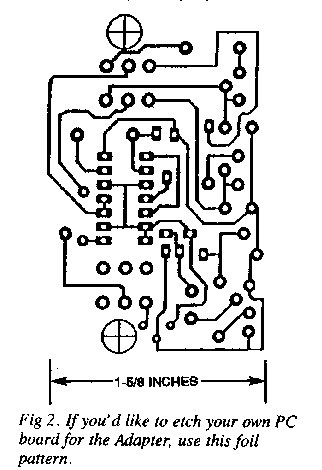
or order the kit from the source mentioned in the Parts List.

   PARTS LIST FOR THE
   INDUCTANCE METER
       ADAPTER

SEMICONDUCTORS
IC1 - 74HC132 Quad Schmitt trigger
  NAND gate, integrated circuit
IC2 - LM340T-5 (LM7805) positive 5-Volt
  regulator, integrated circuit
D1 - IN4148 diode

RESISTORS
All fixed resistors are 1/4W, 5%
R1 - 1000 ohm trimmer
  potentiometer
R2 - 33,000 ohm
R3 - 220 ohm
R4 - 10,000 ohm
R5 - 100,000 ohm
R6, R7 - 10,000 ohm trimmer
  potentiometers
R8, R9 - 22,000 ohm

CAPACITORS
C1 - 0.01 uF monolithic
C2 - 0.1 uF monolithic
C3 - 0.001 uF monolithic

ADDITIONAL PARTS AND
   MATERIALS
S1 - DPDT switch, PC-mount
S2 - SPDT switch, PC-mount
J1, J2 - Spring-loaded terminal
PL1, PL2 - Banana Plug, red and black.
B1 - 9V alkaline battery

Printed-circuit materials, project
   enclosure, battery connector,
   400 uH and 5 mH (or similar
   value) calibration inductors, wire,
   solder, hardware, etc.

Note: The following is available from
   Marlin P. Jones & Associates, Inc.
   (P.O. Box 12685, Lake Park, FL
   33403-0685: Tel: 800-432-9937)
   Inductance Meter Adapter kit
   (including everything except a
   battery, case, and banana plugs)
   $14.95 plus $4.50 shipping and
   handling. Florida residents please
   add appropriate sales tax.


If you're using a PC board, refer to the parts-placement diagram shown
in Fig. 3
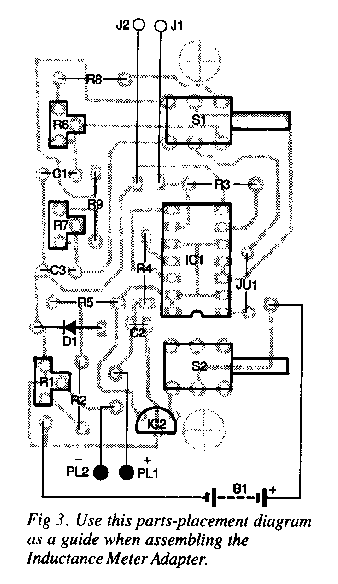
when building the circuit. Begin by mounting a socket for IC1; be sure
to match the orientation shown. Install the resistors and capacitors.

Solder the switches to the board. Then go on to mount the diode and
potentiometers, making sure they are oriented properly. Install wire-jumper
JU1 and a battery-snap connector for B1. Then solder insulated wire leads for
the connections to J1, J2, PL1, and PL2. Keep the leads to J1 and J2 as short
as possible, as they could affect the readings given by the unit. The leads
for PL1 and PL2, on the other hand, should be somewhat long; that will make
it easier to connect the Adapter to a DMM. Solder banana-plugs PL1 and PL2 to
the leads. To complete onboard assembly, mount IC2 and insert IC1 into its
socket, being sure to check the polarity of both.

The next step is to prepare the enclosure for the Adapter. Any enclosure of a
suitable size can be used. Mount jacks for J1 and J2 to the case first. To make
it easier to temporarily connect unknown conductors to the circuit, use
spring-loaded terminals for J1 and J2 (they come with the kit). Drill holes
in the case to accomodate the switches and the PL1 and PL2 wires. Mount the
PC board.

CALIBRATION AND USE.

After checking your work, connect a 9V battery to the battery clip and set
the switch S2 to ON. To calibrate the circuit, you'll need a couple of inductors
with known values, preferably values equal to or near 400uH and 5mH. If possible,
measure the values of the inductors you use with an accurate meter to determine
their exact values. Connect output leads PL1 and PL2 to a voltmeter set to the
200-milliVolt scale and place a short piece of wire directly across terminals
J1 and J2. Set range switch S1 to Low and adjust R1 for a reading of zero on
the meter.

Now set the DMM to the 2-Volt range. Remove the wire from J1 and J2 and connect
the 400-uH inductor (or whatever value you have that is closest). Adjust R7 so
that the voltage displayed on the DMM is the absolute value of the inductance.
For example, a 400-uH inductor will give a reading of 0.400 Volt. Now connect
the 5-mH inductor and set the range switch to High. Adjust R6 so that the
voltage displayed on the meter is the same as the inductance value. A 5-mH
inductor should read between 0.003 and 0.005. Remember to disregard the decimal
point. In the High range, measure from 100uH to 5 mH and the display will read
from 0.001 to 0.500.

END