Figure 1 - Pink Noise
Generator for Audio Testing
| Elliott Sound Products | Project 11 |
For audio testing, a pink noise source is an invaluable tool. It is essentially a flat frequency response noise source, and will quickly show any anomolies in speaker systems, room acoustics and crossover networks.
White noise (the sound you hear when a TV is tuned to a non-existent station) has a frequency characteristic which raises the power level by 3dB with each increasing octave, and is not suitable for response testing (and will probably blow your tweeters as well). By combining a 3dB / octave filter and a white noise source, we can get a very good approximation to "perfect" pink noise, where the power in the octave (for example) 40 to 80Hz is exactly the same as in the octave 10kHz to 20kHz.
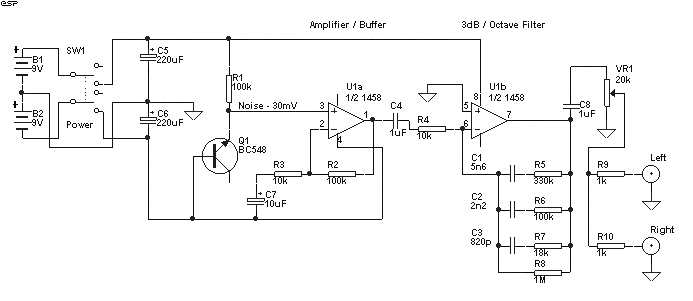
Figure 1 shows the circuit diagram for the filter, which uses the 1458 dual op-amp for economy. There is no point using a low-noise device in something which is specifically designed to make noise, so this op-amp is fine for the purpose.

Figure 1 - Pink Noise
Generator for Audio Testing
The BC548 transistor is connected so its emitter-base junction is reverse biased, which creates a nice noisy zener diode. With the values shown, the average noise output is about 30mV (broadband). The transistor zener voltage is a bit iffy, mine runs at about 9V, but it could be anywhere from 5V up to 10V. The first op-amp stage acts as an amplifier / buffer, providing a very high input impedance (so as not to load the noise source), and having a gain of 11 (20.8dB). The positive battery supply connects to pin 8 of the op-amp, and the negative to pin 4 - don't mix up the battery polarity, or the op-amp will die.
The second stage is a 3dB / octave filter, which is quite linear across the frequency band 20Hz to 20kHz. This converts the white noise into pink noise, having equal energy in all 10 octaves of the audio band.
Because of the comparatively high zener voltage of the transistor, the supply voltage needs to be somewhat higher - 2 standard size 9V alkaline batteries in series (18V) should run the unit for far longer than you will ever want to listen to it. Because of the limited capacity of the 9V batteries, no indicator LED has been included, as this would draw more current than the rest of the circuit. The power switch must be a Double Pole, Single Throw (DPST) type, as both batteries must be disconnected. The centre-tap of the batteries is the earth (or ground) for the unit.
The entire circuit can be laid out on a piece of prototype board, and mounted in a suitable plastic or metal box. No special precautions are needed, other than ensuring that polarised components (transistor, op-amp, and electrolytic capacitors) are connected the right way 'round. Values of components are not critical, so standard tolerance components should be fine throughout. The use of 1% metal film resistors to keep noise to a minimum is not required in this circuit! The transistor can actually be any small signal type you have handy, and so can the dual opamp (or a pair of single opamps can be used - note that their pinouts are completely different).
If you have an oscilloscope or can get access to one, check that the noise output is not clipping (you won't be able to hear it, but if it clips, the energy spectrum will be modified). There is no easy way to check without a 'scope, and the noise output from transistors used in this way tends to vary somewhat. If clipping is observed (or you suspect it), increase the value of R3 or R4 (both 10k). Doubling the value (of one or the other - not both) will reduce the output by half. There are digital "pseudeo-random" noise generators available, but I don't like them, since they have a cycle which eventually repeats and this is very audible. By contrast, the unit described is completely random, as only analogue can be.
Using A Noise Generator
Connect the generator to your preamp, and slowly advance the level control until the sound level is at about the level of normal speech (about 65dB). Carefully listen for any "tonality" in the sound, such as a low hum, or a point where the signal seems to disappear (sometimes referred to as a "suckout"), or anything which does not sound like pure noise. This will probably take a little practice - if you have a graphic equaliser handy, this is a great way to introduce peaks and dips to hear what they sound like.
Try listening through a good set of headphones, and compare the result with the speakers and room acoustics, you might be surprised at the result. I once read a story where an engineer was trying to find out where the hum in his noise generator was coming from. It turned out that the noise generator had no hum at all, but he was hearing the bass resonance from a badly designed loudspeaker - you can get results from these little guys!
Reference : Electronics Today International, November 1981 - Audio White Noise Generator Employs Digital Technique (3dB/octave filter component values)
| Copyright Notice. This article, including but not limited to all text and diagrams, is the intellectual property of Rod Elliott, and is Copyright (c) 1999. Reproduction or re-publication by any means whatsoever, whether electronic, mechanical or electro-mechanical, is strictly prohibited under International Copyright laws. The author (Rod Elliott) grants the reader the right to use this information for personal use only, and further allows that one (1) copy may be made for reference while constructing the project. Commercial use is prohibited without express written authorisation from Rod Elliott. |