x = ( S / (
 /2) )
arctan( b / a )
/2) )
arctan( b / a )
5. Microstepping of Stepping Motors
Part of
Stepping Motors
|
Microstepping serves two purposes. First, it allows a stepping motor to stop and hold a position between the full or half-step positions, second, it largely eliminates the jerky character of low speed stepping motor operation and the noise at intermediate speeds, and third, it reduces problems with resonance.
Although some microstepping controllers offer hundreds of intermediate positions between steps, it is worth noting that microstepping does not generally offer great precision, both because of linearity problems and because of the effects of static friction.
Recall, from the discussion in Part 2 of this tutorial, on Stepping Motor Physics, that for an ideal two-winding variable reluctance or permanent magnet motor the torque versus shaft angle curve is determined by the following formulas:
h = ( a2 + b2 )0.5Where:
x = ( S / (
a -- torque applied by winding with equilibrium at angle 0.This formula is quite general, but it offers little in the way of guidance for how to select appropriate values of the current through the two windings of the motor. A common solution is to arrange the torques applied by the two windings so that their sum h has a constant magnitude equal to the single-winding holding torque. This is referred to as sine-cosine microstepping:
b -- torque applied by winding with equilibrium at angle S.
h -- holding torque of composite.
x -- equilibrium position.
S -- step angle.
a = h1 sin(((Where:)
b = h1 cos(((
h1 -- single-winding holding torqueGiven that none of the magnetic circuits are saturated, the torque and the current are linearly related. As a result, to hold the motor rotor to angle
((
), we set the currents through
the two windings as:
Ia = Imax sin(((Where:
Ib = Imax cos(((
Ia -- current through winding with equilibrium at angle 0.Keep in mind that these formulas apply to two-winding permanent magnet or hybrid stepping motors. Three pole or five pole motors have more complex behavior, and the magnetic fields in variable reluctance motors don't add following the simple rules that apply to the other motor types.
Ib -- current through winding with equilibrium at angle S.
Imax -- maximum allowed current through any motor winding.
The utility of microstepping is limited by at least three consideraitons. First, if there is any static friction in the system, the angular precision achievable with microstepping will be limited. This effect was discussed in more detail in the discussion in Part 2 of this tutorial, on Stepping Motor Physics, in the discussion of friction and the dead zone.
The second problem involves the non-sinusoidal character of the torque versus shaft-angle curves on real motors. Sometimes, this is attributed to the detent torque on permanent magnet and hybrid motors, but in fact, both detent torque and the shape of the torque versus angle curves are products of poorly understood aspects of motor geometry, specifically, the shapes of the teeth on the rotor and stator. These teeth are almost always rectangular, and I am aware of no detailed study of the impact of different tooth profiles on the shapes of these curves.
Most commercially available microstepping controllers provide a fair approximation of the sine-cosine drive current that would drive an ideal stepping motor to uniformly spaced steps. Ideal motors are rare, and when such a controller is used with a real motor, a plot of the actual motor position as a function of the expected position will generally look something like the plot shown in Figure 5.1.
Figure 5.1Note that the motor is at its expected position at every full step and at every half step, but that there is significant positioning error in the intermediate positions. The curve shown is the curve that would result from a perfect sin-cosine microstepping controller used with a motor that had a torque versus position curve that included a significant 4th harmonic component, usually attributed to the detent torque.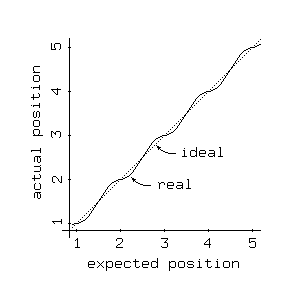
The third problem arises because most applications of microstepping involve digital control systems, and thus, the current through each motor winding is quantized, controlled by a digital to analog converter. Furthermore, if typical PWM current limiting circuitry is used, the current through each motor winding is not held perfectly constant, but rather, oscillates around the current control circuit's set point. As a result, the best a typical microstepping controller can do is approximate the desired currents through each motor winding.
The effect of this quantization is easily seen if the available current through one motor winding is plotted on the X axis and the available current through the other motor winding is plotted on the Y axis. Figure 5.2 shows such a plot for a motor controller offering only 4 uniformly spaced current settings for each motor winding:
Figure 5.2Of the 16 available combinations of currents through the motor windings, 6 combinations lead to roughly equally spaced microsteps. There is a clear tradeoff between minimizing the variation in torque and minimizing the error in motor position, and the best available motor positions are hardly uniformly spaced! Use of higher precision digital to analog conversion in the current control system reduces the severity of this problem, but it cannot eliminate it!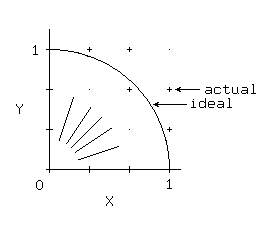
Plotting the actual rotor position of a motor using the microstep plan outlined in Figure 5.2 versus the expected position gives the curve shown in Figure 5.3:
Figure 5.3It is very common for the initial microsteps taken away from any full step position to be larger than the intended microstep size, and this tends to give the curve a staircase shape, with the downward steps aligned with the full step positions where only one motor winding carries current. The sign of the error at intermediate positions tends to fluctuate, but generally, the position errors are smallest between the full step positions, when both motor windings carry significant current.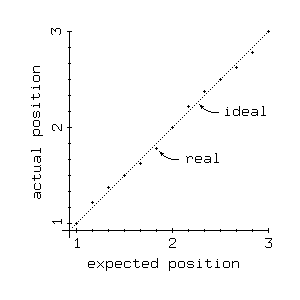
Another way of looking at the available microsteps is to plot the equilibrium position on the horizontal axis, in fractions of a full-step, while plotting the torque at each available equilibrium position on the vertical axis. If we assume a 4-bit digital-to-analog converter, giving 16 current levels for each each motor winding, there are 256 equilibrium positions. Of these, 52 offer holding torques within 10% of the desired value, and only 33 are within 5%; these 33 points are shown in bold in Figure 5.4:
Figure 5.4If torque variations are to be held within 10%, it is fairly easy to select 8 almost-uniformly spaced microsteps from among those shown in Figure 5.4; these are boxed in the figure. The maximum errors occur at the 1/4 step points; the maximum error is .008 full step or .06 microsteps. This error will be irrelevant if the dead-zone is wider than this.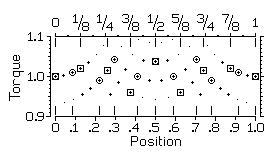
If 10 microsteps are desired, the situation is worse. The best choices, still holding the maximum torque variation to 10%, gives a maximum position error of .026 full steps or .26 microsteps. Doubling the allowable variation in torque approximately halves the positioning error for the 10 microstep example, but does nothing to improve the 8 microstep example.
One option which some motor control system designers have explored involves the use of nonlinear digital to analog converters. This is an excellent solution for small numbers of microsteps, but building converters with essentially sinusoidal transfer functions is difficult if high precision is desired.
As typically used, a microstepping controller for one motor winding involves a current limited H-bridge or unipolar drive circuit, where the current is set by a reference voltage. The reference voltage is then determined by an analog-to-digital converter, as shown in Figure 5.5:
Figure 5.5Figure 5.5 assumes a current limited motor controller such as is shown in Figures 4.7, 4.8, 4.10 or 4.11. For all of these drivers, the state of the X and Y inputs determines the whether the motor winding is on or off and if on, the direction of the current through the winding. The V0 through Vn inputs determine the reference voltage and this the current through the motor winding.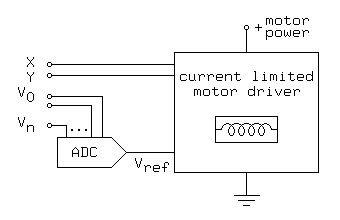
There are a fair number of nicely designed integrated circuits combining a current limited H-bridge with a small DAC to allow microstepping control of motors drawing under 2 amps per winding. The UDN2916B from Allegro Microsystems is a dual 750mA H-bridge, with a 2-bit DAC to control the current through each. bridge. Another excellent example is the UC3770 from Unitrode. Unitrode. This chip integrate a 2-bit DAC with a PWM controlled H-bridge, packaged in either 16 pin power-dip format or in surface mountable form. The 3717 a slightly cleaner design, good for 1.2 A, while the 3770 is good for up to between 1.8 A or 2 A, depending on how the chip is cooled.
The 3955 from Allegro Microsystems incorporates a 3-bit non-linear DAC and handles up to 1.5 A; this is available in 16-pin power DIP or SOIC formats. The nonlinear DAC in this chip is specifically designed to minimize step-angle errors and torque variations using 8 microsteps per full-step.
The LMD18245 from National Semiconductor is a good choice for microstepped control of motors drawing up to 3 amps. This chip incorporates a 4-bit linear DAC, and an external DAC can be used if higher precision is required. As indicated by the data shown in Figure 5.4, a 4-bit linear DAC can produce 8 reasonably uniformly spaced microsteps, so this chip is a good choice for applications that exceed the power levels supported by the Allegro 3955.