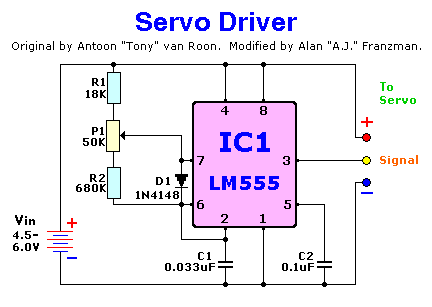
PARTS LIST:
   IC1 = LM555 Timer (or equiv.)    R1 = 18K (Brown-Gray-Orange; 183)
    C1 = 0.033uF (33nF; 333)        R2 = 680K (Blue-Gray-Yellow; 684)
    C2 = 0.1uF (100nF; 104)         D1 = 1N4148 or other small
    P1 = 50K Linear Potentiometer        silicon signal diode
Notes:
The simple, inexpensive circuit above can vary the control pulses from about 0.6 to 2.4 mSec, and handle control signal currents up to 200 mA. (If your servo's control input needs this much current, something is wrong!) This should be sufficient to achieve standard or greater control horn deflection with all servos. At Vin = 4.8 volts, positive pulse amplitude is about 4 volts at a frame rate of about 50 Hz (20 mSec). For more info on how servos work, see my Servo.txt file.
Warning: this circuit can produce pulses which exceed the nominal limits of 1.0 to 2.0 mSec, which can cause servos to attempt to overtravel or behave strangely in the regions near the travel limits. A side effect of this is that servos will have MORE travel (or "throw") when using this ciruit than they will when using most R/C radio setups. If you wish to change the travel provided by this circuit, decreasing R1 will shift both endpoints in one direction. Increasing R1 will shift both endpoints in the opposite direction. Adding a resistor between pin 7 of the 555 and +V will shift both endpoints in the same direction as increasing R1, but will also reduce the total travel -- try 680K to start, reduce this to reduce travel further. If you want a high degree of adjustability in the circuit, replace R1 with a 50K trim rheostat, and put a 1Meg trim rheostat in parallel with the end taps of P1.
If your servos sometimes shudder and fail to track the potentiometer position properly (and you have the travel adjusted well within the servo's mechanical and electrical limits), this may be caused by weak batteries or too high a frame rate. If fresh batteries do not cure the problem, decrease the frame rate by increasing R2 to 750K or more.
Servo wire colors: There are several conflicting standards for servo wiring, even though the control signals are the same. The only constant is that the +V wire is always red. The +V wire is usually in the center position of the 3-wire connector, except on KO and older Airtronics style servos which have the -V wire in the center. The -V wire is usually black (brown on JR, and blue on newer Airtronics style servos.) The control signal wire is never in the center of the connector, and it can be yellow, orange, white, blue or black. If you happen to have 4-wire (Kraft style) servos, the 4th wire is a midpoint voltage "ground" which is supposed to be exactly halfway between +V and -V.
Last updated 17 July, 2001