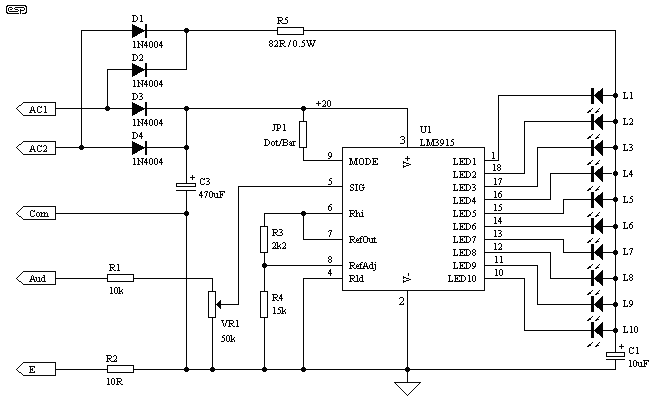
Figure 1 - The LED VU
Meter Circuit
It is quite true that there are many variations of this circuit already on the WWW, but for the sake of completeness (and because I will be producing PCBs for this version) here is yet another.
The LED meter is simpler and smaller than it's analogue counterpart, and is very common in audio equipment. This version is based on a National Semiconductor IC, and uses the logarithmic version. Each LED operates with a 3dB difference from the previous one, and a jumper is provided to allow dot or bar mode.
This project is also an essential part of the expandable analyser to be published soon, and one meter circuit is used for each frequency band. There are many other uses for a simple LED VU meter. They are ideal as power meters on amplifiers, can be used with mixers (including the high quality mixer described in the project pages), preamps and any other application where it is important to know the signal level.
The circuit is completely conventional, and is based on the application notes from National Semiconductor. The circuit is shown in Figure 1 and as you can see it uses a single IC and a few discrete components. There are two rectifier circuits so that the DC to the LEDs is almost unfiltered. This allows a higher LED current with lower dissipation than would be the case if the DC were fully smoothed, and full smoothing would also require a much larger capacitor. This increases the size and cost of the project - especially important if it is to be used for the expandable analyser, since there will be at least 10 meter circuits needed.
Figure 1 - The LED VU
Meter Circuit
L1 to L8 will normally be green (normal operating range) and L9 and L10 should be red (indicating overload). This gives a 6dB overload margin when the unit is calibrated as described below. As shown, full scale sensitivity (with VR1 at maximum) is 12 Volts peak (approximately 8.5 volts RMS). This is designed for direct connection to the speaker output of an amplifier, but is still suitable for use with preamps if the sensitivity is changed.
Power comes from a 15-0-15 transformer. You can generally use the smallest one available, as average power is quite low. The peak current is about 120mA DC, so a 5VA transformer will be sufficient to power two meter circuits. One 15V winding goes to the terminal AC1, the other goes to AC2 and the centre tap is connected to Com (Common). The 10 ohm resistor isolates the earth connection to help prevent hum if the same transformer is used to power a preamp (for example).
The formula for sensitivity is somewhat complex, and is further complicated
by the fact that the same resistors that change the reference voltage also
affect the LED current. As shown, LED current is about 12mA. To save
you the (very) tedious calculations, I have prepared a table to use to
set the reference voltage. This always needs to be slightly lower
than the voltage to be measured, so that fine adjustments can be made with
VR1. LED current is fixed at about 10-13mA for all voltages.
| Ref. Voltage | R3 (k) | R4 (k) | I led (mA) |
| 12 (11.6) | 2.2 | 15 | 12 |
| 10 (9.99) | 2.7 | 15 | 10.2 |
| 8 (8.13) | 2.2 | 10 | 10.4 |
| 6 (5.81) | 1.8 | 5.6 | 10.5 |
| 4 (3.81) | 1.2 | 2.2 | 12.9 |
| 2 (2.20) | 1.2 | 0.82 | 11.9 |
The circuit only senses the positive signal (i.e. it is half-wave only). In most cases this is not a problem, because although audio waveforms are asymmetrical, the overall signal usually balances out over a period of time. If this is not desirable, a simple rectifier circuit using a dual opamp (a cheap one is quite OK) is shown in Figure 2, and can be added between the signal source and the input. This is not a "precision" rectifier, and as such will introduce a small error into the signal, causing the sensitivity of low level signals to be reduced. The lowest couple of LEDs will therefore not be exactly 3dB apart, but for monitoring purposes this error can be completely ignored.
If this is to be used, substitute a fixed 100k resistor for VR1 (from Pin 5 to ground) in Figure 1, and bring the signal into the IC via R1 as shown. VR1 in the signal rectifier will be used to change the gain rather than the meter circuit. R3 and R4 should use the values shown in Figure 1 for best accuracy.
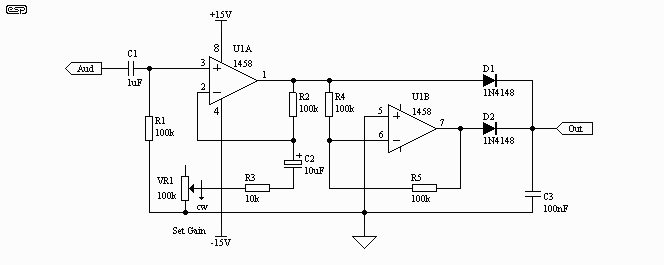
Figure 2 - Simple Full
Wave Rectifier
The signal rectifier needs a +/- supply of 15 volts, and the output
is fed directly into the "Aud" input of the meter circuit. I suggest
that the signal level to the rectifier be reasonably high (or use the "Set
Gain" control to increase the gain of the first stage). This will
minimise the errors from the "less than perfect" rectifier. The reason
for not using a precision rectifier circuit is simply one of cost - there
are more components, the opamp needs to be better than the 1458 specified,
and the result is just not worth the extra effort. The speed of the
circuit can be adjusted by varying the value of C3. With a high value
(say 10uF), the meter will act more like a peak programme meter, holding
the highest peaks for a relatively long time. The lower the value,
the more quickly the meter will respond.
| Note - the input to this circuit MUST be less than 10V RMS at all times. Higher levels will destroy the opamp's input circuit. For higher voltage an input attenuator must be used, and a 10k resistor used in series with the input. |
The gain of this circuit (as shown) is limited to a maximum of 11. At higher gain values, cheap opamps (such as the 1458) will be unable to amplify the highest frequencies due to their bandwidth limitations. This means that the lowest level signal you can have for a full scale reading will be about 1.3V peak, or about 900mV RMS. The maximum gain I would recommend is obtained using a 4.7k resistor for R3. This will give a gain of about 22, at which point the response will barely make it to 20kHz. This equates to a maximum signal sensitivity of a little under 400mV RMS. It is unlikely that this will ever be needed in practice, as it is far too low to operate any preamp or mixer and retain respectable noise performance.
You have (of course) selected the resistors R3 and R4 to give a reference voltage slightly lower than the peak voltage to be measured. Now the meter can be calibrated to suit your application.
This could not be simpler. At the maximum level you wish to operate the equipment (as shown on an audio millivoltmeter or oscilloscope with signal applied), adjust VR1 so that the signal illuminates all the green LEDs (L1 is the most sensitive, and L10 indicates maximum level, so L1 to L8 should be lit). If the input is directly from a speaker output, an additional series resistor should be used at the "Aud" input terminal to reduce the level. This can be determined by calculation (I leave this to you) or by experiment. As a guide, for a 50W amplifier, the external resistance should be about 47k ohms.
If you are using the external signal rectifier, VR1 should have been omitted from the circuit as described above. Apply the signal voltage to the input of the signal rectifier at the maximum permitted level. Adjust VR1 (on the rectifier) to illuminate LEDs L1 to L8.
If you are calibrating the meter for a power amplifier, set the output to a level just below clipping. Adjust the level control until all LEDs are illuminated. This way, if the last LED (L10) lights when you are listening to music, you will know that you are very close to clipping, and the volume should be reduced.